
Recently, Google asked us to ensure that each of our customers have their own Google Developer account. Their primary concern is that any application or developer who is consuming data from their APIs must have explicitly agreed to their terms of use and must be accountable for any how they use that data.
Until now, we have made it optional for you to use your own Google Developer account so that it’s a little easier to get started with our service. Anyone who has not configured their own consumer credential for Gmail, is using a shared CloudSponge credential.
It’s pretty clear that Google’s concerns over privacy and accountability overshadow our desire to make integration as easy as possible, so we are sunsetting the ability for customers to share our Gmail Credentials.
This means that you’ll need to perform a one-time update to your CloudSponge integration, consisting of three activities:
- Add a special Proxy URL to your web site. This is an HTML page that works on any application platform.
- Set up your own Google Developer account and obtain your credentials.
- Input the credentials from your Google Developer account into your CloudSponge account.
How do I know if I need to do anything?
We’ll let you know two ways:
- We have sent you an email explaining that you need to update your Google branding.
- When you sign into your CloudSponge account, you will see an in-app message pointing you at this blog post.
Ask us if you are not sure and we’ll check on your account and let you know if you need to take any action.
New Customers
The configuration process is the same for all customers. However, new customers will have to complete the Google configuration before you are able to import Gmail contacts. When you sign into your account, we’ll prompt you to configure it before you can do any Gmail address book imports.
Existing Customers
Existing customers will have to configure a Google Developer Account and register your credentials with us as soon as possible, in order to continue being able to import Gmail address books. You can follow the step-by-step below.
Many existing customers have have already added Gmail branding to their account and do not need to take any action.
What Needs to Happen?
Step 1: Add your Proxy URL
You will need:
- to be able to add files to your web site. If you are unable to do that, you’ll need to involve a developer who can for this step only.
To add the Proxy URL to your site:
- Download the proxy files here or review the full gist.
- Add
auth-proxy.htmlandauth-proxy.jsto the same directory on your web server. - Make a note of the public URL of
auth-proxy.htmlon your site for the next steps. For example, https://example.com/path/to/auth-proxy.html
For reference, here is a link to our complete instructions for adding your Proxy URL.
Take note of:
- the URL of auth-proxy.html on your site for the next steps. For example, https://example.com/path/to/auth-proxy.html
Step 2: Configure your Google Developer Account
You will need:
- to be able to agree to Google’s Terms of Service on behalf of your company.
- the URL of the Proxy URL from Step 1 (example https://example.com/path/to/auth-proxy.html).
You must create an account with Google, if you don’t already have one, and configure a project to use Google’s People API. You’ll use the client-id and client-secret from Google in your CloudSponge account.
Show detailed Google Developer Account instructions
After you follow these steps, your users will see your product name in the Google Authentication window.
Important:
Google requires you to submit a review of your application before they will allow strangers to use approve your OAuth permission requests. Google warns that the OAuth review may take up to a week. In our experience, the review may be faster than 24 hours as long as Google doesn’t have any questions about your application. We’ve prepared some background and directions to help you navigate the new process successfully. You can still test out your integration immediately.
These are the actions required to set up your Google OAuth:
- If you haven’t already done so, create a Proxy URL on your application’s domain.
- Obtain your Google OAuth 2.0 Credentials.
- Configure your CloudSponge account with your Google OAuth credentials.
- Request a review on Google’s OAuth Developer Verification Form.
Obtain your Google OAuth 2.0 Credentials
Watch how to create a Google OAuth credential in a few minutes.
Or follow the general steps below:
- Sign into the Google Developer Console with your Google account.
- Create a new project, or click on an existing one.
- Ensure that the People API is enabled for your project.
- Configure your consent screen with your product name and other details.
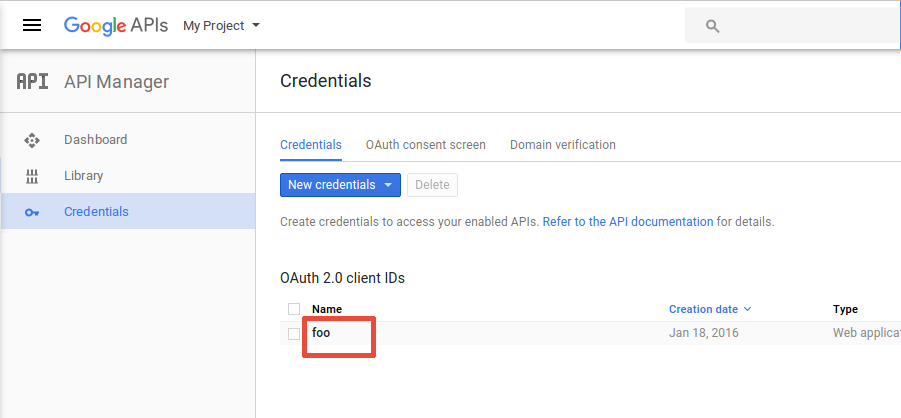
- Create a new credential for your project.
- Under Application type, select Web application,
- Fill
Authorized redirect URIswith your Proxy URL. - Click Create
- Note your Client ID and Client Secret. You will enter these into CloudSponge.
- Click over your app credentials in order to view details.

- Take note of your
Client ID,Client secret.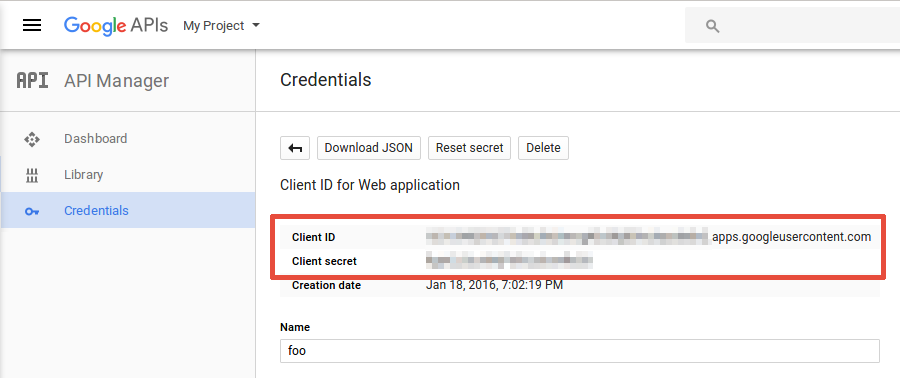

- Click over your app credentials in order to view details.
Configure your CloudSponge account with your Google OAuth credentials
- Sign in to your CloudSponge account and add a new Gmail OAuth Credential.
- Enter the
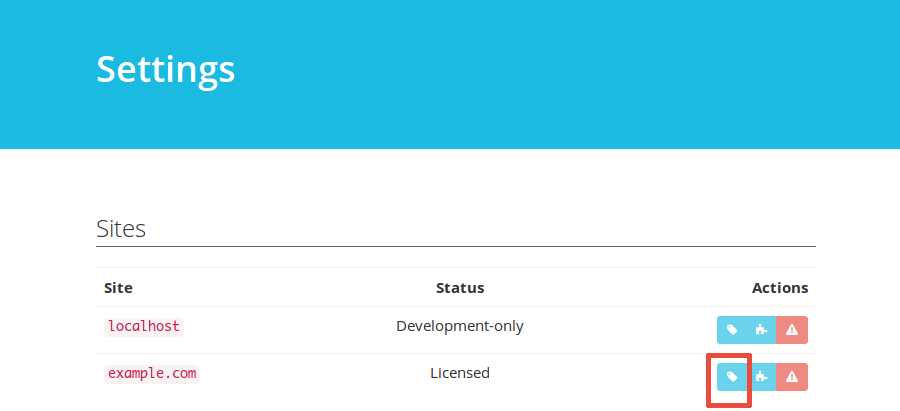
Client ID,Client secretandRedirect URIvalues from Google and click on Save button. - Open your Account Settings page.
- Click the OAuth Credentials Settings button for the desired domain:

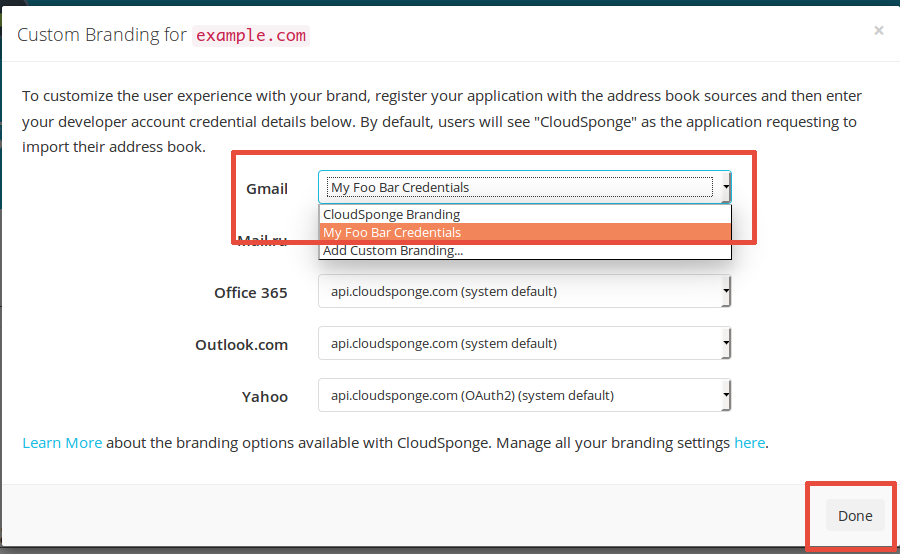
- For Gmail, select the newly inserted credential and click on Done button:

- Test a Google import on your site.
NB If you observe a 400 error with a message of “Error: invalid_scope” when you attempt to complete the OAuth flow, then your OAuth account needs to be reviewed before Google will let you request access to people’s address books. This is a new requirement that they introduced on May 11, 2017. We’ve prepared some background and directions for navigating the new review process.
Request a review on Google’s OAuth Developer Verification Form
Read our background and directions for a quick turnaround from the review process.
Take note of:
- the
client-idandclient-secretfrom your Google Developer Account for Step 3.
Find the complete step-by-step guide here.
Step 3: Add your Credentials to CloudSponge
You will need:
- to be able to sign into your
- the Proxy URL from Step 1
- the
client-idandclient-secretfrom your Google Developer Account in Step 2
To add your credentials to CloudSponge:
- Input the credentials from your Google Developer account into your CloudSponge account here.
- Test a Gmail address book import on your site. You should see your own application name on the OAuth consent page.
Congratulations, it’s done!
How long do I have to implement this change?
We don’t yet have a firm deadline for making this change, but it is something that you should do as soon as possible to prevent the possibility of your Gmail imports breaking.
We’ve created step-by-step instructions to take the learning and guesswork out of the process. If we missed anything or you have a question, just let us know and we’ll help you through it.
What’s the problem with sharing a Google Client id?
All CloudSponge customers have already agreed to Google’s Terms Of Use, because they have agreed to our Terms of Use which contains a section referring to their terms explicitly. So why don’t they want us to share credentials?
When we all share credentials, it’s impossible for Google to tell the difference between accesses to their API from legitimate web sites from sites that are using the address book data in bad ways. If we all share the same credential, the only way for Google to turn off one site is to turn us all off!
By having your own Google Developer account, you yourself from any other customer who may not have their user’s best interests at heart.
What about other OAuth sources?
In time, we may implement a similar strategy with our other OAuth sources. And we will update you if/when we start to enforce those changes.
What’s next?
Thanks for taking the time to read about this new change. It’s a small change to our product, but a big win for privacy and accountability.
If you have any questions, reach out and we’ll happily address them.