This is a complete walkthrough for setting up your CloudSponge account to be able to connect to Google address books.
Setting up your Google OAuth credential typically this takes about an hour.
Get Ready:
Before you start, you’ll need:
- To be able to add or modify files on your server,
- A Google account that is a verified owner of your website, and
- Access to your CloudSponge account.
Overview
I’ll walk you through 5 steps below:
- Set up your Proxy URL
- Create Your Google OAuth Credential
- Configure Your CloudSponge Google Credential
- Apply for a Google Review Approval (for production only)
- Enable Your Credential in Production (for production only)
Step 1: Set up your Proxy URL
When a user completes the OAuth consent flow, their browser is redirected back to your application with some OAuth data included in the URL. CloudSponge needs this data to integrate with the People API on your behalf. The Proxy URL is how your site redirects this data to CloudSponge’s servers.
In practice, the Proxy URL is a static HTML page that you add to your server at an appropriate location. Implementing the Proxy URL is easy because we’ve done it for you.
Choosing the location of the Proxy URL is easier when you understand what it does and its requirements.
The Proxy URL should satisfy several conditions:
Consistent
The Proxy URL must be available at the same URL for all users. For example, https://www.example.com/auth-proxy.html is a good URL, but https://www.example.com/users/1234/proxy is not when the number in the URL is may change for each user. This is because the URL can only be changed in the Google OAuth credential settings.
Public or Protected
The Proxy URL may be a publicly accessible page or it may be located in the authenticated part of your site as long as anyone who may be granting consent also has access to the Proxy URL. A publicly accessible page is recommended. Hosting the Proxy URL in public means that you can use the same OAuth credentials for other environments like development and staging if you like. Or even if you prefer to create separate OAuth credentials, you can use the same Proxy URL eliminating the need to manage the URL in multiple environments.
No Sitemap
The Proxy URL should never be linked to from anywhere else. It will only be visited at the end of the OAuth consent flow.
No UI Required
Since the page immediately redirects, there is no need for any UI on the Proxy URL.
Once you decide where your Proxy URL will live on your site, keep the URL in mind. You’ll use it in the next two steps.
If you still have any questions about the Proxy URL, reach out to me via email or in our Slack community.
Step 2: Create Your Google OAuth Credential
In this step you will set up a project and OAuth credential using a Google account that has been verified as an owner of your site using the Google console.
You’ll need the following data handy to configure your OAuth Credential data:
- Your application name
- A contact email for your organization that will be displayed to end users who are being asked for content to access their contacts.
- Your product name to be shown to users.
- A public URL for your privacy policy.
- The following data is optional but recommended:
- Your homepage URL.
- Your product logo (up to 120×120).
- A public URL of your Terms of Service.
Armed with this information, the setup should go smoothly.
Watch how to create a Google OAuth credential in a few minutes.
Or follow these general steps:
- Sign in to your Google Account.
- Verify that you are an owner of your production site in the Google Console.
- Follow the Google OAuth steps in our documentation
- Confirm that you’ve enabled the People API for your project
- Confirm that you’ve included a public URL to your privacy policy in your OAuth Consent Screen Settings.
- Confirm that you’ve included the Proxy URL as an Authorized redirect URI in your OAuth 2.0 client ID.
Your OAuth credential contains three key pieces of infomration that need to be input into your CloudSponge account.
- OAuth client ID
- OAuth secret
- Authorized redirect URI (a.k.a. Proxy URL)
In the next step, you’ll enter this information into your CloudSponge account.
Step 3: Configure Your CloudSponge Google Credential
This step involves copying and pasting data between your Google Developer Console and your CloudSponge account. You’ll copy and paste the content from your Google OAuth 2.0 client ID into our New Gmail OAuth Credentials page.
NB Ensure that you don’t enable this OAuth credential for your production site at this time because users will see a strong warning page. If you follow the link above, your newly created credentials will not be associated with any of your sites, as intended.
Alternatively, you can download the Client JSON from Google and email me about automatically updating your configuration in CloudSponge.
If you are working in a non-production environment, you are done!
Continue, if you are getting ready to use CloudSponge for your production site.
Step 4: Apply for a Google Review Approval
If you are working in a non-production environment, this step is not required. In development, you may see a warning page as you attempt to allow access to your contacts. Your users will see this page in production until Google has approved your OAuth app.
Before you apply for a review, make sure you have completed the site ownership step in the Search Console and that you have set the privacy URL in your Google Developer Account.
We’ve covered the background and offered tips on how to complete the review form in our blog article on the subject.
Or, you can go straight to Google’s OAuth Developer Verification Form.
Step 5: Finally, Enable Your Credential in Production
Google will send you an email when they approve your credential. If you don’t want to take their word for it (and I suggest that you don’t), test it out for yourself. We’ve provided a (subtle) link to test each of your credentials in your CloudSponge account.
False Positives
If you test the OAuth flow with an account that is associated with the OAuth credential, Google may not show you the warning screen, even if your credential hasn’t been reviewed successfully. 😿
So use a separate Gmail account to get the real experience. 😸
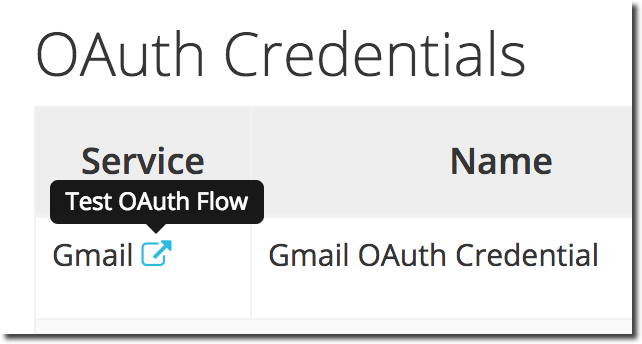
Look for the handy link to test your credential
In Step 3, you didn’t enable your new Gmail OAuth credential for production. Once Google approves your reivew request, you can finally associate it with your production site(s) and your journey to the light side will be complete!
If anything appears unclear or incorrect, reach out to me via email or in our Slack community. Google may have updated their process or I may need to clarify this description.