You need to prove that you own your domain before Google will approve your OAuth project. Here’s how to do it.
Did you already verify your domain?
Maybe you aren’t quite sure that your domain is verified. Maybe you are trying to figure out which Google account has verified your domain. Whatever the reason, you can use this checker to find out!
-
Step 1: Enter your domain and click ‘generate’.
Which Domain?
Before you start, think about your domain. It is a best practice to verify the root domain for your application. This ensures that Google knows you own it and all its sub-domains.
For example, often apps have a marketing site hosted on a subdomain like www.example.com and may also include functionality inside a signed-in portal like app.example.com. In this case, you would verify your ownership of example.com.
Even if your entire application is hosted under a subdomain like www.example.com, you should still verify ownership of example.com. This is the best way to ensure that Google approves your OAuth project. Why? Because Google says so. They require that your OAuth project uses an Application domain that is a “top private domain“, i.e. a root domain like example.com.
To verify your domain, you need to be able to update your DNS entries. To do this, you need to be able to sign in to your DNS provider and add or update the TXT record associated with the root domain. If you aren’t able to do this, you’ll need to get help from someone at your organization who has this ability.
Which Google Account?
One of the challenges in managing your domain ownership is knowing which Google account might already be verified as an owner of the domain. Unfortunately, there is a catch-22 here because you can’t really know which emails are owners of a domain until you are signed in to one of them.
Once you are a verified owner of a domain, you can view and manage the other owners on the domain. So the practical advice here is to choose a logical Google account as the owner. Ideally, your choice of account will be obvious (or well documented) so that in the future you know which one to use.
Let’s go!
- Sign in to the Google account that you will use to manage your domain ownership.
- Visit Google’s Search Console.
- Look in the property selector for your root domain (you can search if there are a lot of properties).

- If you found your root domain, congratulations! you are finished. Skip the remaining steps.
- If you did not find your root domain, don’t worry. The remaining steps describe how to add and verify it.
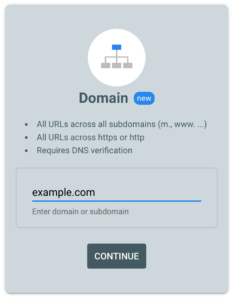
- You didn’t find the domain, so click on “+ Add property” in the property selector now.
- Add your root domain to the “Domain” property type and click continue. Remember, the root domain should not include the
http, any subdomain or any path.example.comis all you want.

- Follow Google’s instructions for adding a TXT property to your DNS record.
- Click ‘Verify’ in the search console. Because it takes some time for your DNS record to update everywhere, it may take some time (up to 24 hours) for Google to be able to verify your ownership.
- Once Google verifies the domain, Congratulations, you are nearly there!
- The last thing to do is to add the verified domain to your Google Project. Visit the domain verification tab and add your domain to the project.
Well done
Adding a new domain to your Google account is not hard, once you know how. These steps will help you navigate the process and assist in making the right choices so you only need to do it once.