The Proxy URL lets the OAuth providers (Google, Yahoo or Outlook.com) know that you are asking CloudSponge to get the address book for you. The sole purpose of this page is to accept the OAuth code parameter from the provider and “proxy” it to CloudSponge.
The OAuth flows provided by Google, Yahoo and Outlook.com are designed for a site like yours to request access to a person’s address book. After the person grants consent, they are redirected back to your app. In order for CloudSponge to be able to do the heavy lifting of importing and normalizing the contacts for your site, your application must hand the consent code over to CloudSponge.
You can accomplish this with a special page on your site that we refer to as Proxy URL.
The diagram below shows the Proxy URL in orange. If the Proxy URL is missing or doesn’t function properly, the “code” will not be passed to CloudSponge and the address book import will appear to be abandoned.

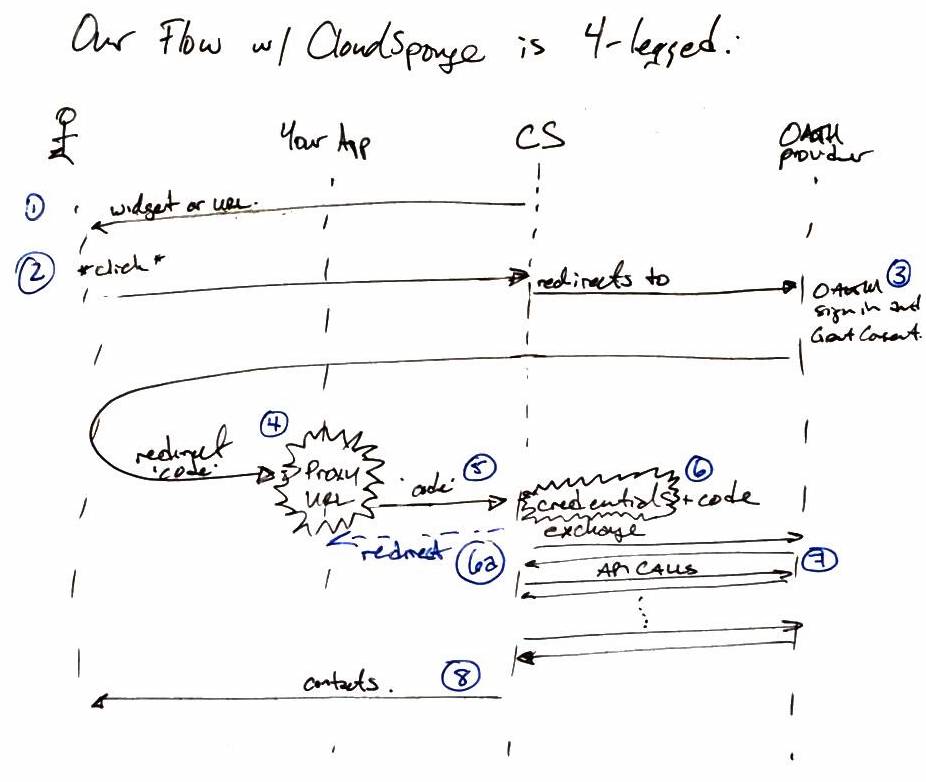
The Proxy URL must be hosted by your application so that the OAuth provider can verify that your application is controlling the flow of data. For example, Google wants to be sure that they are redirecting the browser back to your application. It manually verifies all apps that request access to users’ address books.
Supported Platforms
If you are using one of the platforms listed below, you are in luck! We have already done some work just for you to help you get your Proxy URL working.
bubble.io
We have a CloudSponge Proxy plugin that can be added to any page to implement our Proxy URL. Just create a new, blank page in your bubble.io app and then add our plugin to that page.
Instapage
Adding a Proxy URL to Instapge is a little tricky because it is a block-based platform so you can’t just add a new HTML page. So we’ve split the Proxy URL code into two parts for you in this gist and put together a screencast to demonstrate how to create the Proxy URL in your Instapage app.
Better Sharing for KickoffLabs
If you are using KickoffLabs, you can install our Better Sharing plugin.
Your KOL sharing page is your Proxy URL. Copy the URL of this page without the query string and use it as the Authorized Redirect URI for Google, Microsoft and Yahoo OAuth.
Better Sharing for Conjured Referrals
If you are using Conjured Referrals, you can install our Better Sharing plugin. Your Conjured Referral page is your Proxy URL. Copy the URL of this page without the query string and use it as the Authorized Redirect URI for Google, Microsoft and Yahoo OAuth.
If you are using another platform for which adding an HTML page is not straightforward, let us know! We’re happy to do our best to help guide you.
Javascript Proxy URL (Recommended)
We have a Javascript Proxy URL implementation that has no server-side dependencies. It consists of a static HTML page and Javascript file which implements the required behaviour.
Complete the following steps to install and test your OAuth proxy endpoint:
- Download the file here or review the full gist.
- Add
solo-auth-proxy.htmlto the same directory on your web server. Your Proxy URL is done! - Verify the Proxy URL by visiting the
solo-auth-proxy.htmlpage on your server.
You should see some text and a link. Make a note of the URL, you will use this URL as Proxy URL when setting up your Developer Accounts and also the OAuth Credentials in CloudSponge.
Next you can set up your OAuth Credentials for each OAuth source, using the URL for solo-auth-proxy.html.
This Javascript implementation page is preferred over our older reference implementations because there are no server-side dependencies. Any site that can host a static HTML page can host the Proxy URL.
Server-side Proxy URL (deprecated)
For new integrations, please use our Javascript Proxy URL. The server-side Proxy URL reference implementations are listed below for reference only.
Your Proxy URL should be a transparent pass-through between the client and api.cloudsponge.com: all request data should be forwarded directly upstream to https://api.cloudsponge.com/auth. Likewise, all response headers and data should be returned directly to the client. The page you create on your site to proxy requests needs to accept all GET parameters, make an HTTP connection to https://api.cloudsponge.com/auth, passing the parameters with the request. When the response comes back from api.cloudsponge.com, the exact headers and body should be returned to the client. The typical gotcha is following redirects: api.cloudsponge.com/auth returns a 302 response in many cases. Ensure that your system is configured to not follow redirects for the proper result.CloudSponge may return a 302 Found and a Location in the response header. This response header should be returned to the user’s browser. Some platforms will automatically follow redirects so you must ensure that this functionality is turned off on your system.
Important Note: The Proxy URL cannot follow any redirect response from CloudSponge. It must proxy the request and include any GET parameters with the payload to CloudSponge.
We have several reference implementations of working Proxy URLs:
- HTML/Javascript – Recommended
- PHP (depends on the CloudSponge PHP library)
- Ruby (depends on the CloudSponge Ruby gem)
- ASP .Net
- Java Servlet
- Groovy & Grails
- Python & Django