Big Steps:
- Tell Microsoft about your app and get credentials
- Add the credentials from Microsoft to your CloudSponge Account
- Verify your Application with Microsoft
Microsoft’s OAuth is used to access Outlook.com and Office 365 address books. Outlook.com also includes hotmail.com, live.com, and associated internationalized email addresses.
Before you begin Microsoft OAuth, ensure you have everything you need:
- Your Proxy URL.
- Your Microsoft login.
- Your logo.
- Links to your site, privacy policy, and terms of service links.
After you follow these steps, your users will see your domain in the Microsoft Authentication window instead of ours.

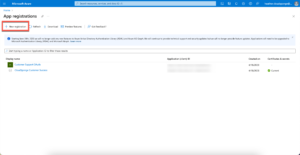
1. Go to App Registrations in the Azure Portal.
2. Click on New Registration and complete the “Register an application” form.
-
- Name: Enter the name of your app,
- Supported account types: choose “Accounts in any organizational directory and personal Microsoft accounts”. This is an important step. Without the correct selection, you will be limited by who is able to share their contacts based on the type of Microsoft account they have.
- Redirect URI: select the Web platform and enter the public URL of your Proxy URL from Step 1.
- Click Register to create the registration. You should be redirected to the new App registration. If not, go to App Registrations on the left-hand side.
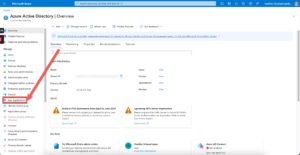
3. Click on Manage > Branding & Properties in the App registrations side menu. This page lets you specify what the user will see and input your branding details:
-
- Upload your logo, paying close attention to Microsoft’s requirements for image format and size. This is considered best practice since it creates a visual cue for users as they are being asked to share their information.
- Enter the URLs for your Home page, Terms of Service, and Privacy Statement. These pages are linked to from the OAuth consent page.
- Verify your Publisher Domain: You can skip this for now, but you will need to verify your domain in order to show the blue verified check mark your users will look for. Remember, it’s under the Branding and Properties section of your Microsoft Azure portal.
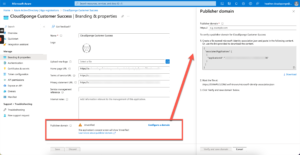

Click configure a domain to verify your domain.
-
-
- If you prefer to verify your domain using DNS, follow these instructions. The following steps describe verifying your domain by adding a file to your server.
- Click Configure a domain or Update domain (depending on which is visible)
- Select the Verify a new domain tab if it is visible.
- Publisher Domain: Enter your application’s domain.
- Upload the JSON content to the location specified on the form.
- Click “Verify and save domain.”
- Enter your MPN Publisher ID (This can be done later, but you will need it to verify your domain.
- Under Publisher verification, click on Add MPN ID…
- Enter your Publisher MPN ID into the MPN ID field and click “Verify and save”
- Save your branding changes.
- If you don’t have an MPN Publisher ID yet, follow these steps:
- Visit https://partner.microsoft.com/
- Click “Sign in“
- Click “Become a partner“
- Follow the steps to verify yourself and your company
- Wait for Microsoft to complete the verification.
-
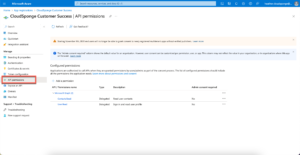
4. Add API permissions:
-
- Click on Manage > API permissions in the App registrations side menu.
-
- Click on Add a permission to open the permissions selector.
- Click on Microsoft Graph
- Click on Delegated permissions
- Find and select Contacts.Read in the list.
- Click Add Permissions.
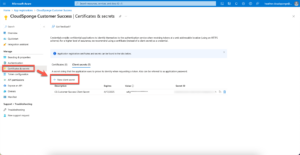
5. Get your client secret:
-
- Click on Manage > Certificates & Secrets in the App registrations side menu.
- Click on New Client secret
-
- Enter a Description for the secret, e.g., CloudSponge
- Select “24 months” for the Expires value.
- Record your “Client Secret Value,” and save it somewhere safe. You will not be able to retrieve it later on and will be forced to create a new client secret. You need your Client Secret Value to add to your CloudSponge account.
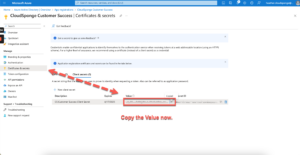

Copy your Value and save it. - Click Add.
6. Add your OAuth credential to CloudSponge:
-
- Sign in to your CloudSponge account and Add OAuth Credential from your keys page.
- Enter the Client ID and Client Secret that you recorded above, and the Redirect URI where you created the CloudSponge Proxy in step 1 above.
- Your Microsoft app has several IDs, be sure to use the Application (client) ID.
- To associate the branding with your site: check the Default box on the OAuth form.
7. Phew! Now you can test your connection to Outlook.com on your site to verify that the OAuth flow correctly reflects your branding.
You can learn more about Microsoft’s Application Registration Portal here.
Microsoft Verification
Microsoft will display ‘unverified’ to your users next to your app name during the OAuth flow. Obviously, this is not ideal. It erodes people’s confidence and will prevent some of them from completing the sharing request.
To fix it, you’ll need to become a verified member of the Microsoft Partner Network (MPN). This process is not complicated. Microsoft will verify some details about your business and issue you a Publisher ID. You can then add it to your App Registration to enable the permission prompt, including a verified badge.
Check your Microsoft Contact Importer status.